
Off road driving is synonymous with tough terrain and challenging conditions. Conditions could include fog, snow, rocky terrain, flooding or muddy conditions, steep terrain, bushes and shrubs, and sandy conditions in desert areas. One needs to be careful when selecting the lights to use, and for first-time buyers of off roads lights it can prove a bit difficult to make the right selection.
Most conditions above call for auxiliary lighting. This refers to an additional set of lights to the typical car headlamps. One can choose to mount auxiliary lights permanently or temporarily. When driving in the city, off road lights are not necessary. In fact, you can easily be pulled over and get a ticket for using off road lights on city streets. The off road lights are often very bright and can be a hazard to others on the road.
Factors to Consider When Deciding on Off-road Vehicles Lights
Many factors need to be considered when deciding on which type of off road lights are right for your vehicle and particular needs.
- The type of off-road activity will you be engaging in.
- The type of vehicle being used.
- The type of terrain you will be driving on, as some terrain can only handle overhead lights.
- The type of conditions and choice of mounting.
- Duration of activity. Some lights have a battery pack independent of the vehicle and may need recharging.
- Cost and what you can afford.
- Power and longevity of the car battery. Some lights can drain the vehicle battery so a special or additional battery may be needed or a few modifications made to support the lights.
- Your technical expertise as some lights require more skill to mount due to having complex wiring.
After considering the above factors, one has to choose the right bulbs to support.
Types of Bulbs for Off-road Vehicles
- LED (Light Emitting Diodes) are becoming increasingly popular because they are the most energy efficient. They are about ten times more efficient than normal halogen bulbs and produce more light than other bulb types. LED lights are also more compact, more durable and not easily damaged by impact and vibrations. And with so many stylish options in different sizes, shapes, and even colors, you are sure to find the ones that work for you.
- Halogenlights are what you find typically and you can always find them readily available. They use a lot of energy comparatively to LEDs. For those looking for a reliable, cost effective, yet powerful off road light, these are a great choice.
- HID(High-Intensity Discharge) bulbs are usually relatively brighter than other bulbs and can shine twice as far. They are established in their design, reliable, and are good when driving fast and in bad weather conditions.
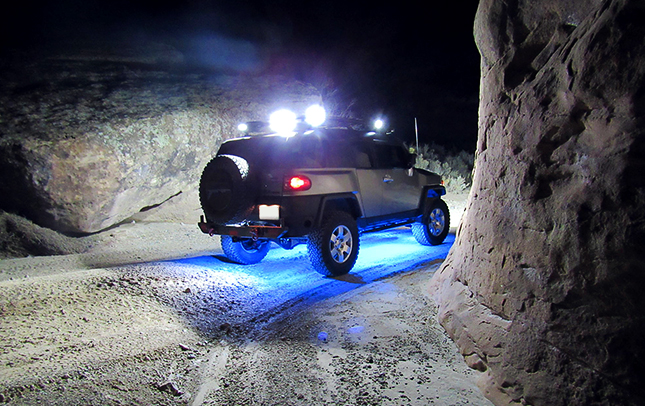
Types of Lights for Off Road Vehicles
This refers to the shape and pattern of the light emitted from the auxiliary light. The shape the light takes is often determined by the optic lens and reflectors used within the light unit. Different patterns will be needed depending on the desired application and mounting location.
- Spotlights: Spotlights are great when you need a concentrated light to be thrown further ahead or away from the vehicle. The narrow spread of the optic lens used in spotlights makes it perfect to be used as driving lamps, to further illuminate a particular area, or even to fill in the areas that are insufficiently lit with a multi light setup. Do note that the definite “circle of light” casted by spotlights make it less ideal to be used to light up the areas around the vehicle.
- Floodlights: Like the name implies, floodlights have a wider spread of light versus spotlights. The wider spread casted through the floodlights optic lens allows a sizable area to be illuminated with diffused lighting. This diffused lighting results in less flashback from environmental elements such as fog, snow, or sand; and also gives off a much more mellow light compared to its spotlights counterpart making it suitable to be used to light up campgrounds or worksites. Floodlights are the lens type to go with when using the auxiliary light as fog lights, reverse lights, or lighting to illuminate the immediate vicinity around the vehicle.
- Combination Light bars: Primarily only available with LED bulbs. LED light bars in larger size variations often come in a combination of flood and spot lenses. The combination of both type of lenses brings the best of both worlds together by offering a strong concentrated light to be thrown further ahead of the vehicle while casting a diffused light more towards the sides as peripheral coverage. In addition to getting the most light output for your buck, combination light bars adds a tough and rugged demeanor to your vehicle, which is often consider a bonus when outfitting a vehicle with lights.
Mounting Off Road Lights
Just as the type of light pattern will vary between the lenses, the methods of mounting an auxiliary light on off road vehicle varies greatly as well.
- Portable mounts for handheld lights: These are usually carried inside the car and are retrieved when needed. They are light-weight and can be utilized by other motorists not necessarily driving off-road, for emergency purposes or other uses.
- Through bolt mounting onto tabs: Metal tabs can be present on the bull bar, headache rack, roof rack, or various other exterior vehicle body parts for mounting auxiliary lights with through bolts. Metal tabs can easily be fabricated and welded onto vehicle parts if no pre-existing mounting tabs exist. Custom fabricated work will result in a neater finish and is often necessary when the distance of the mounting holes for the through bolts on the auxiliary light fails to line up with existing tabs on the vehicle body. Through bolts are often fastened with lock washers or lock nuts for a secured fitment.
- Through bolt surface mounting: Similar to mounting with through bolt onto tabs, surface mounting of an auxiliary light utilizes through bolt and locking fasteners to secure an auxiliary light onto a vehicle body part of choice. With the absent of tabs, the resulted fitment with surface mounting usually makes the auxiliary light appear to be less prominent, more low profile, and much more unison with the vehicle body. Through bolt surface mounting usually requires the through bolt to be longer as the layer it needs to pass through are often thicker than tabs. In addition, surface mounting with through bolt will require the installer to double make sure that no other vehicle component would be damage from drilling of the mounting holes for the through bolt. Through bolts are often fastened with lock washers or lock nuts to prevent the hardware from being shaken loose from vibration.
- Recessed/flushed mounting: Recessed or flush mounting requires a cut out that is larger or equal to the size of the outer housing of the auxiliary light to be present or to be made. The auxiliary light is then placed within this cutout and secured with hardware for a flushed and seamless look. Since flushed mounting allows the installer to hide the entire auxiliary light and its wiring out of plain sight, the resulting setup is as seamless and inconspicuous as outfitting vehicles with auxiliary lights can get. However, flushed mounting does come with some caveats. Cutting out a large piece of the vehicle body to fit an entire auxiliary light in may lead to damage of other vehicle components. It is imperative for the installer to double and triple check that no other vehicle components could be damaged due to the install. This often times mean the removal of various vehicle components just to gain a clear sight to the area behind the mounting surface of choice to make sure the installation would be practical. Furthermore, situating an auxiliary light inside a confined space will eliminate the option of tilting the light unit at various angle for the best light coverage. One often has to decide between aesthetic and functionality when mounting lights recessed or flushed to the vehicle body.
- Clamps for bar mounting: When welding of tabs or drilling of permanent mounting holes are not ideal, the utilization of clamps for bar mounting is a great alternative option. Obviously horizontal or vertical bars in front of the grille, bumper, or on top of the vehicle will need to be present for clamps or bar mounting to be feasible. However, utilizing clamps for mounting of auxiliary light provides and easy, almost fool proof way for one to outfit their vehicle with lights. There will also be the option to rearranging the configuration and placement of the light as the clamps can be easily repositioned on the vehicle.
- Vehicle specific bracket and hardware: From the a-pillar mounts of a Jeep Wrangler to an over the windshield bracket for a Ford F-150, there are an array of vehicle specific mounting brackets and hardware available in the market. The abundance of selection can be a double edge sword. The user/installer must make sure that the bracket to be purchased is meant for their particular vehicle’s year, make, model, and pay extra attention to the size of the mounting hole for it to fit the hardware included with the auxiliary light. When mounting larger light bars to a particular given space created between two pieces of vehicle specific bracket, the given space and the length of the light bar of choice must match to a T; as the brackets often are rigid and offers little room for size variance. In the case when the hardware and size of the auxiliary light all matches up perfectly, using vehicle specific bracket and hardware often results in the easiest and cleanest install.
Other Things to Note
Deciding on the auxiliary light to use and where to mount it on the vehicle is only half of the story. Here are additional points to consider when outfitting a vehicle with auxiliary lights.
- Wiring and power distribution: Once you have decided on the selection of auxiliary light and its mounting location on the vehicle, the next big thing to put some thought into would be how the power would be distributed amongst the auxiliary equipment. Not all auxiliary lights are made the same. Two LED light bars advertise with the same amount of wattage production may be drawing different amount of amperage due to the difference in the LED drivers used. Always test the amperage being used by the equipment and make sure that the gauge of the wire, size of the fuse, and capacity of the relay will be heavy enough to handle the load drawn by the all equipment on the given circuit. It is also a good practice to utilize as many relays or circuits as possible on a multi light setup. Even only having two separate circuits for a multi light setup will drastically reduce the chance of all the lights failing at once if the integrity of the circuit is to be compromised. Lastly, an upgrade all off-road warriors should consider is to incorporate a dual battery schematic into their setup. Not only may the dual battery setup offer you enough power to bring you and the vehicle back to civilization in case the vehicle alternator fails while off-roading, the second battery can also be used to jump start the main battery in case it dies out. More importantly, a dual battery setup will be needed if you are planning to run power hogging equipment off of your vehicle. This includes big stereos, winches, and of course, auxiliary lighting. A thoroughly thought out plan of how the wiring would be setup goes a long way. Good or bad wiring work can easily make a break the entire off-roading experience.
- Local laws and prohibitions: Most auxiliary light users understand not to turn the lights on while driving on public roads. Most often than not, the lights emitted from the auxiliary lights will be so bright that it will adversely affect the oncoming trafficker’s ability to see the road ahead. One thing that is often overlooked is that many local jurisdictions further reinforce the rule of prohibiting the use of auxiliary lights to be used on public streets by mandating a cover to be placed over the lights when operating the vehicle with auxiliary lights on public roads. It will be best for the user to double check with the local law enforcement agency to make sure that a cover will or will not be needed for their auxiliary light. Not all the auxiliary light models are made with matching covers; so this is definitely something to be decided prior to picking out the light model of choice.
When buying lights for your off road vehicle always go for quality and reputable names, if possible, to avoid disappointment. Finding lights with an extended warranty is best and will also give you some assurance that you are making a wise investment. Consider your choice carefully so as to get your money’s worth and to avoid overlooking great products. And don’t be afraid to seek an opinion from a friend or an expert to assist you to come up with a tailor-made solution to your needs.
Off road lights are necessary to enhance visibility in the extreme conditions you might find yourself playing in. But remember nothing can replace an alert and vigilant driver, so always drive safe as well, and have fun!
Post Comments
You must be logged in to post a comment.
click here to login